
So in our previous tutorial we learned how to modify a unity il2cpp based game and now in this tutorial we will learn how to mod games built with different game engines such as Unreal Engine, Cocos2d, Godot, and more. If you haven’t checked out our basic guide on modding games, please go through it first.
For this tutorial, you will require the following things:
1) IDA PRO – You can find the paid ones for free with a simple google search, if you can’t find then comment below I will send you a link
2) HEX Editor – I use 010 Editor, but you can use any of your choice.
3) WinRAR – For extracting Lib File
4) APK Tool Kit – For Signing APK File
Why do we use IDA Pro, and What is it?
IDA Pro is like a powerful tool used by tech savvy to turn confusing program code into something humans can understand. It helps experts figure out how a software works, what it does, and how to tweak to gain advantage or fix it. Many use it for reverse engineering purposes. The tool makes it easy to understand how an application works and help you modify it.
In Today’s tutorial we will modding a game called My Story by NANOBIT, the game has a subscription where it gives you unlimited tickets that you can use to read stories. We will modify the code to make the game think that we bought the subscription so that we can have unlimited tickets inside the game.
Here are some ARM Instructions you will encounter when using IDA and their meanings.
ARM Instructions
| Instruction | Meaning |
|---|---|
| ADC | Add with Carry |
| ADD | Addition |
| ADR | Load Address |
| AND | Bitwise AND |
| ASR | Arithmetic Shift Right |
| B | Branch |
| BIC | Bit Clear |
| BL | Branch with Link |
| BLX | Branch with Link and Exchange |
| BX | Branch and Exchange |
| CMN | Compare Negative |
| CMP | Compare |
| EOR | Bitwise Exclusive OR |
| LDM | Load Multiple Registers |
| LDR | Load Register |
| LSL | Logical Shift Left |
| LSR | Logical Shift Right |
| MOV | Move |
| MUL | Multiply |
| MVN | Move Not |
| ORR | Bitwise OR |
| POP | Pop Registers |
| PUSH | Push Registers |
| ROR | Rotate Right |
| RSB | Reverse Subtract |
| SBC | Subtract with Carry |
| STM | Store Multiple Registers |
| STR | Store Register |
| SUB | Subtraction |
| SVC | Supervisor Call |
| TST | Test |
Here’s a list of ARM assembly instructions with simple examples:
MOV (Move)
Moves a value into a register.
Example:
MOV R0, #5 ; Load the value 5 into Register R0
ADD (Addition)
Performs addition between registers or a register and a constant.
Example:
ADD R1, R2, #3 ; Add 3 to the value in R2 and store the result in R1
SUB (Subtraction)
Performs subtraction between registers or a register and a constant.
Example:
SUB R3, R4, #2 ; Subtract 2 from the value in R4 and store the result in R3
LDR (Load from Memory)
Loads a value from memory into a register.
Example:
LDR R5, [R6] ; Load the value from the memory address in R6 into R5
STR (Store to Memory)
Stores a value from a register into memory.
Example:
STR R7, [R8] ; Store the value in R7 to the memory address pointed by R8
CMP (Compare)
Compares two values and sets condition flags based on the result.
Example:
CMP R9, #10 ; Compare the value in R9 with 10
B (Branch)
Performs an unconditional branch to a different part of the code.
Example:
B some_label ; Branch to the code labeled 'some_label'
BL (Branch with Link)
Branches to a subroutine and stores the return address in the link register (`LR`).
Example:
BL subroutine ; Branch and Link to the subroutine named 'subroutine'
These examples illustrate how various ARM instructions work in assembly language.
Let’s Begin
1) Download the APK File from APKCOMBO – Link > My Story Nanobit APK File
2) Once downloaded, move to your desired folder
3) Open the APK File and navigate to Lib folder, and you will find two folders called “armeabi-v7a” and “arm64-v8a” , remove the arm64-v8a as we won’t need it.
4) Enter the “armeabi-v7a” and extract the “libcocos2dcpp.so” file, you may ask how do we know which file to extract if the game is not unity? 90% of the time you just have to extract the largest file, it is usually where all the good stuff is.
5) Now open IDA PRO and load the “libcocos2dcpp.so” click on NEW and select the file
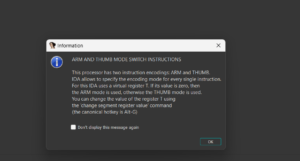
6) Now Click OK
If you get a pop-up like this then click OK Again
7) NOW WAIT, depending on how large the file is, and how powerful your computer is. This may take anywhere from 5 minutes to 50 minutes. So be patient.
Wait until that Yellow circle below Lumina turns Green
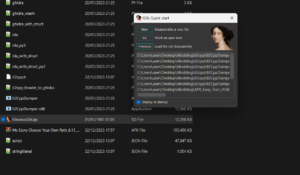
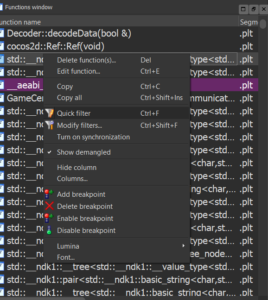
8) Once it is completed, go to Functions Window on the left and Right Click and Select Quick Filter.
9) Now it is time to search for our keywords, since we are looking to modify the subscriptions we will search for terms like:
- Purchased
- IsSubscribed
- isPaid
- isBought
- ETC
For this game, the keyword is “isSubscribed”

As you can see the keyword returned two results, for now the .text can be ignored, you will need to hack that function if you want to modify specific things but for now we will just focus on .plt, i have explained these segments meaning at the bottom of this article.
Another thing to notice is this function is inside TicketController: which indicate that this in fact is the function that checks whether the user has subscribed to unlimited tickets or not. So we need to make it true so that the game things we bought it.
10) Double-click on the first result and a new Window on the side will open IDA VIEW
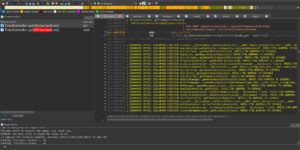
The highlighted number you see is the offset, which is “003F2728”

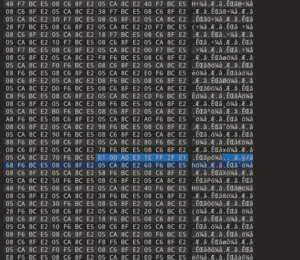
11) Now We need to load the “libcocos2dcpp.so” inside the HEX Editor and go to the address “003F2728” , press CTRL + G and paste the offset and it will take you to the address.
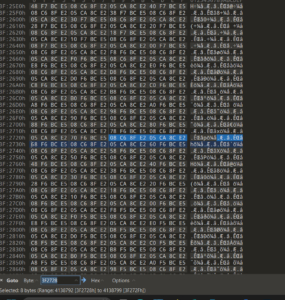
12) Highlight the address and then Change the highlighted address to 01 00 A0 E3 1E FF 2F E1 by pressing CTRL + SHIFT + V and then press CTRL + S to save it
13) Replace the “libcocos2dcpp.so” file back in the APK and Sign in.
14) Once you have signed the APK file, install the APK file and run the game on your device and you shall have unlimited tickets.
That’s it!!
About the .PLT and .TEXT Segments
In IDA Pro, the “.plt” and “.text” segments refer to different parts of the disassembled binary code:
1) .text Segment:
– This segment represents the actual executable code in the binary file. It contains the assembly instructions that the CPU can directly execute.
– The “.text” segment typically includes the main logic, functions, and instructions that make up the program’s executable code.
2) .plt Segment:
– The Procedure Linkage Table (PLT) is a part of the binary’s memory layout that’s related to dynamic linking.
– The “.plt” segment contains a table of function stubs or placeholders used for resolving function addresses during runtime when dealing with shared libraries (dynamic linking).
– When a program calls a function from a shared library, it might not know the exact address of that function in memory. The PLT helps resolve this by redirecting the call to the appropriate function address.
Understanding these segments is crucial when analyzing binaries, as the “.text” segment contains the core code logic, while the “.plt” segment aids in handling function calls and dynamic linking, especially when the program interacts with external libraries.
Conclusion
Modding a native game is almost similar to modding a unity game, as you see most of the process is the same, just that you have to load the .so file in IDA and find the correct methods to hack. If you have any questions or are stuck at any place then please comment below and i will try my best to help you.